QuickBooks Online Plus and Advanced let you organize and analyze your financial data using classes and locations, which you can enable in account settings. Once active, you can create categories tailored to your business structure and assign them to transactions like invoices, expenses, and bills. This allows you to generate detailed reports, including P&L by class or location and segmented balance sheets, giving you clearer insights into business performance and helping you make more informed decisions.
Visit QuickBooks Online
Step 1: Enable class and location tracking.
Click on the cog wheel (⚙︎) in the upper right corner of your dashboard and then click Account and settings under the YOUR COMPANY column.
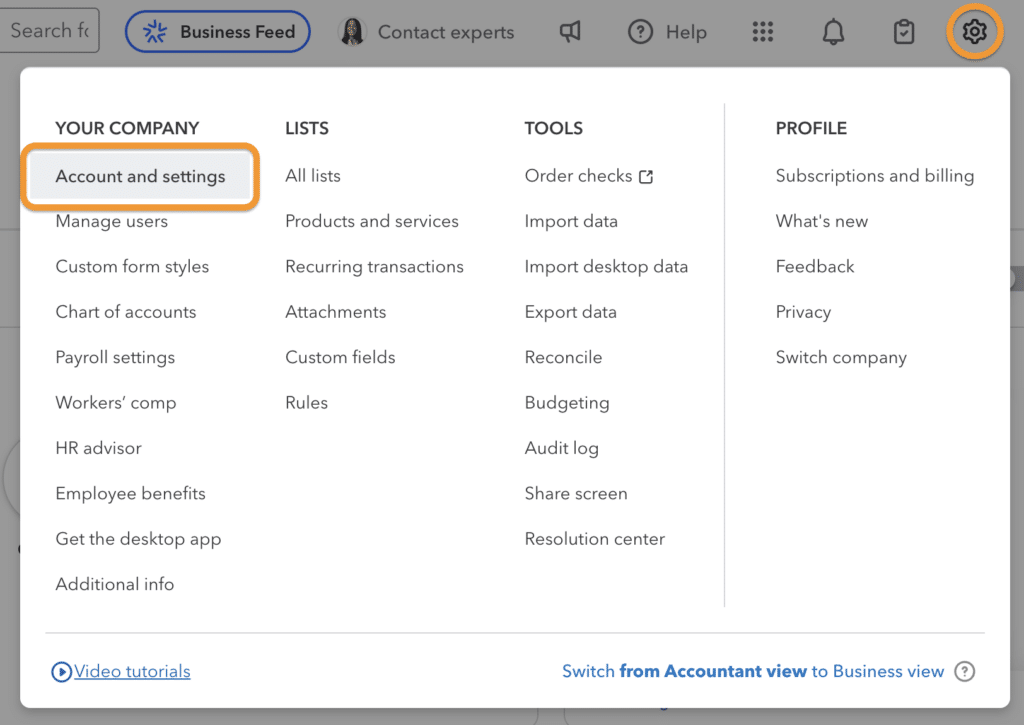
Navigate to Account and settings in QuickBooks
From Account and settings, select Advanced in the left menu bar and then click on the Categories section. From here, you can turn on both class and location tracking in QuickBooks Online or activate only one, depending on your requirements.
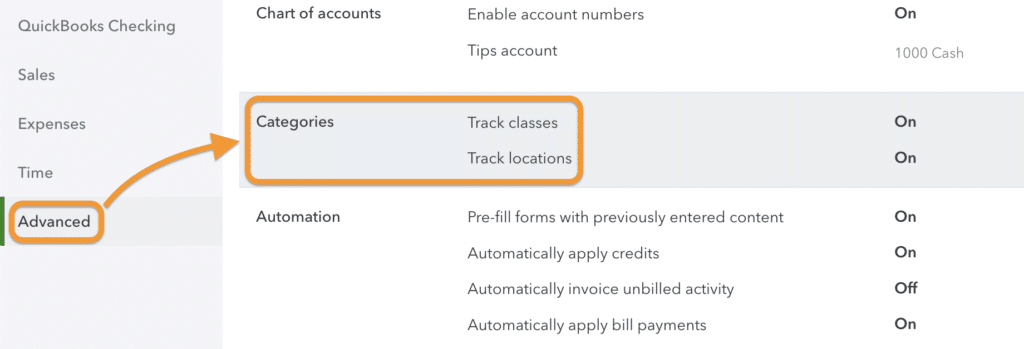
Activate class and location tracking in QuickBooks
Turning on class tracking
To turn on class tracking, switch on the toggle button next to “Track classes.” When turned on, you can tick the “Warn me when a transaction isn’t assigned a class” checkbox if you want QuickBooks to alert you if a transaction is entered without being assigned to a class.
Also, QuickBooks will provide additional options to assign classes to your transactions.
- One to entire transaction: The class you set up will be assigned to the entire transaction, regardless of the number of products or services included. Choose this if you don’t need to track each product or service you sell by class.
- One to each row in transaction: This allows you to assign different classes to individual products or services included in the transaction. This is beneficial when you want to track different parts of a transaction under separate classes. For instance, you might want to assign various products appearing on the same bill to different classes.
Turning on location tracking
To enable location tracking in QuickBooks Online, simply toggle on the “Track locations” option and choose a label that fits your business, like store, department, or property. Unlike class tracking, you can assign only one location per transaction. After setting up class and location tracking, click Save to apply your changes.
Step 2: Create classes and locations.
To create classes and locations in QuickBooks, click on the cog wheel (⚙︎) and then select All lists under the LISTS column. Next, select Classes or Locations from the screen.
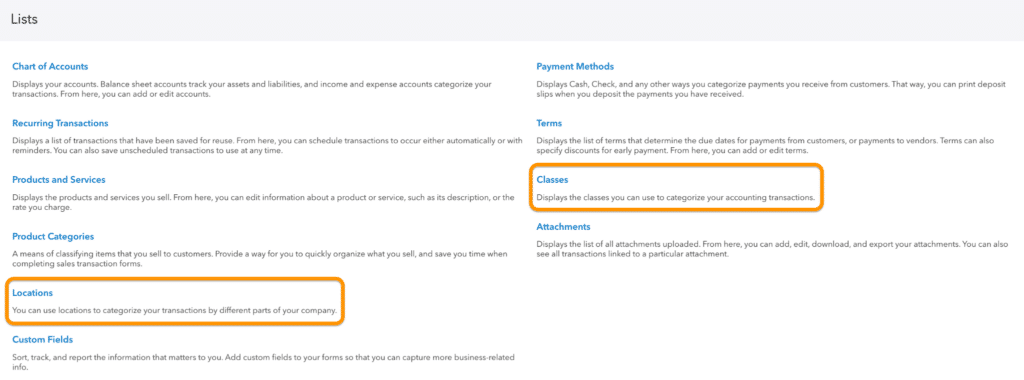
Lists screen in QuickBooks Online
Creating classes
Click on the New button on the Classes screen and then proceed to add a new class. A small window will appear, and you’ll have to enter the name of the class. In the example below, I created a class called Contract Client Repairs so that I can track repairs from contract clients, not walk-in customers.
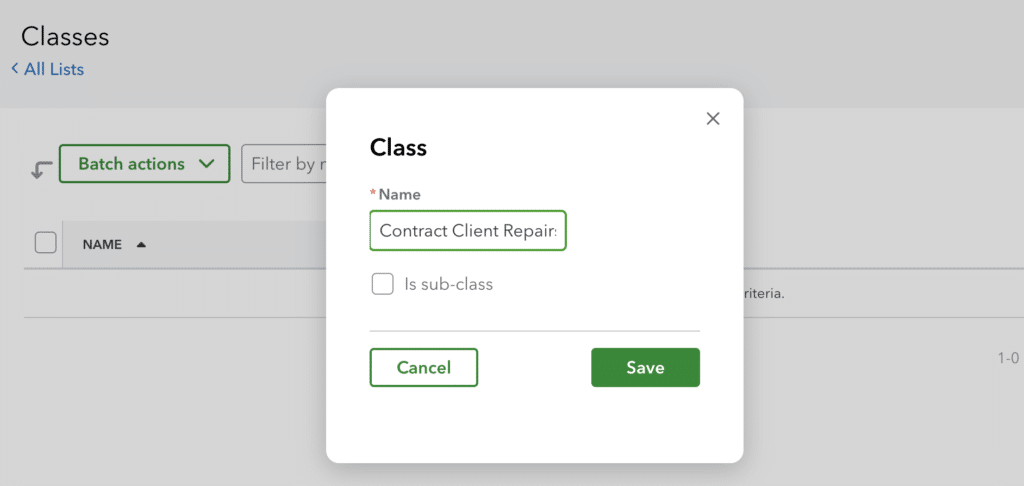
Creating a new class in QuickBooks Online
Once done, click the green Save button.
Creating locations
Similar to adding classes, click the green New button to enter a new location. You can customize the location with several options. For instance, you can add a parent location by ticking the “Is a sub-location” option in the checklist. Once done, click the Save button.
In my example below, I created a location called HQ. In our fictitious company Gadget Garage, I can use the HQ location to track transactions performed in the main office.
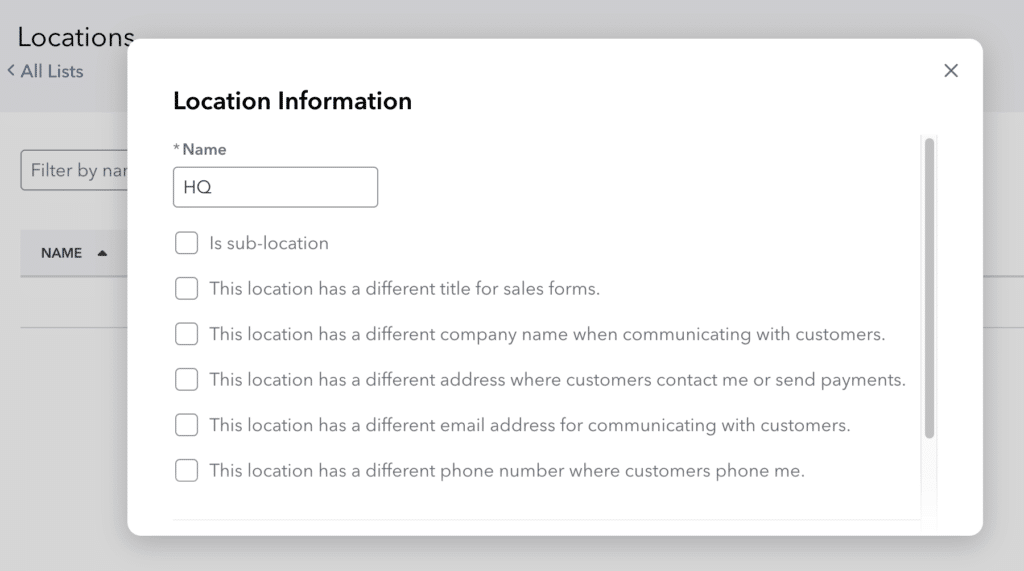
Creating a new location in QuickBooks Online
Editing and inactivating classes and locations
You can update an existing class or mark it inactive if it’s no longer relevant to your business. To do this, go to the Class or Locations screen, click the dropdown arrow in the Action column, and choose either Edit or Make inactive (reduces usage).
While you can’t permanently delete classes or locations, you can reactivate them at any time. Inactive items will still appear in historical reports for reference.
Step 3: Assign classes and locations to transactions.
When creating a transaction, you’ll see fields for both class and location, allowing you to assign each to the transaction. In the invoicing example below, I’ve enabled the global setting “One to each row in transaction” for classes, so each product or service line includes its own Class field. This lets you assign a specific class to every item or service within the transaction.
The image below shows how classes and locations appear when assigned to a transaction. In this sample invoice, the location is set to HQ and the class to Contract Client Repairs. These fields are for internal tracking only and won’t be visible on the customer’s invoice.
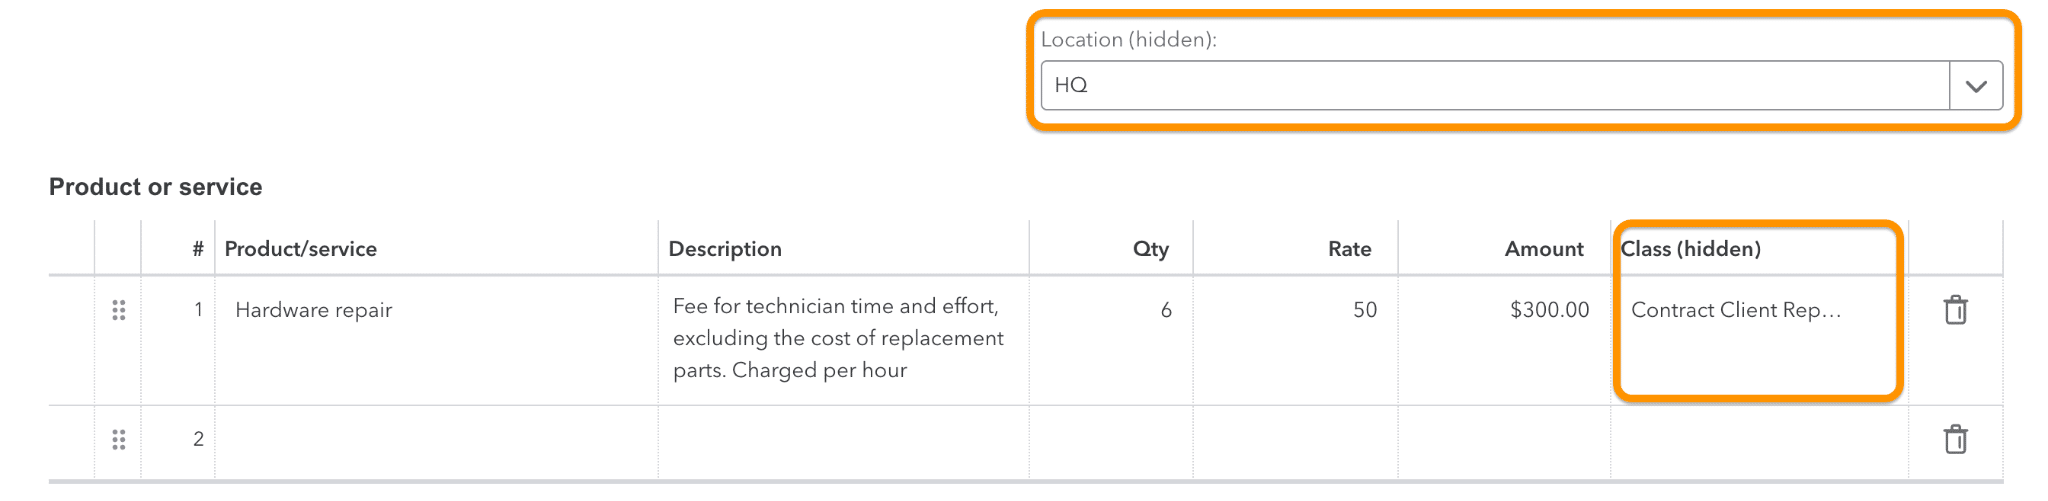
Assigning a class or location to an invoice where each row is assigned a specific class
Similarly, when creating other types of transactions — like expenses, bills, or checks — you’ll see the Class and Location fields available in the form for easy assignment.
Step 4: Use classes and locations on reports.
Click on Reports in the left-side menu and then type the supported report in the search bar.
You can use classes and locations in different reports, including P&L, balance sheets, sales, and purchase reports. For balance sheets with classes and locations, you can’t access them directly on the Reports screen. You have to run a standard balance sheet report and then customize it to display columns by classes or locations.
Here are sample reports on P&L by class and by location:
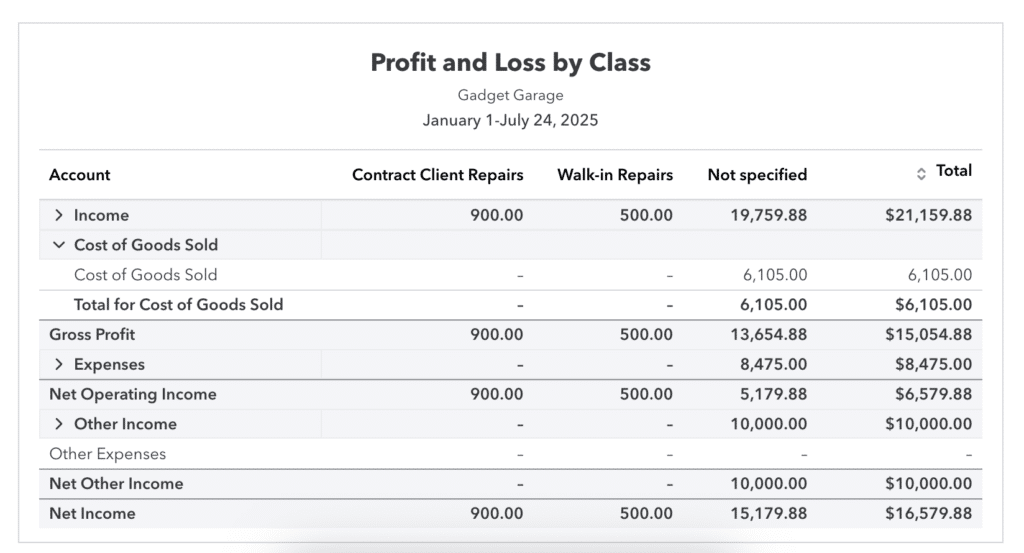
Sample P&L by Class report
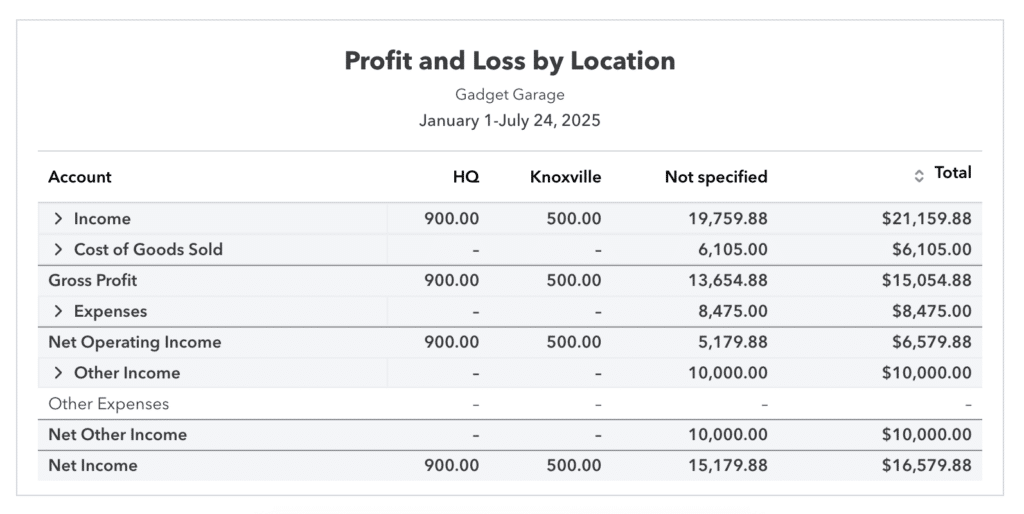
Sample P&L by Location report
“Not specified” in class and location-related reports means that the transaction wasn’t assigned to a class or location.
QuickBooks doesn’t let you run a P&L report by both class and location at the same time, but you can work around this by customizing a single report. Start by opening the P&L by Class report, then use the filter settings to add location details for a more comprehensive view.
The image below shows how I modified the P&L report to use data only for the Knoxville location and Walk-in Repairs class.
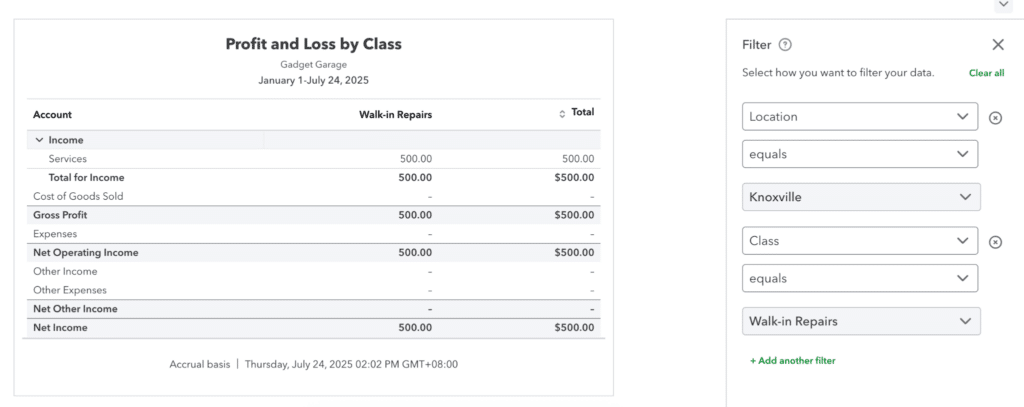
Applying class and location filer to create a customized P&L by Class report
Real-world uses for classes and locations in QuickBooks Online & my tips
Frequently asked questions (FAQs)
Yes, you can. Doing so provides a more detailed tracking of your transactions.
You can assign classes and locations to various transactions, such as invoices, expenses, bills, checks, and deposits.
Yes, you can. You can also use both class and location in a single report by running a standard P&L by class or P&L by location report and adjusting the filter settings based on a specific class and location.
Wrap up
Congratulations on learning how to use classes and locations in QuickBooks Online. If you want to learn more about using QuickBooks, you can check out our other free QuickBooks Online tutorials, which cover both basic and advanced features.