If you’re already using QuickBooks Online and need to pay employees, consider adding QuickBooks Payroll to your plan. You can access it from the same system you use to manage your company’s books, allowing for the seamless transfer of your payroll expenses to the appropriate general ledger accounts.
In this guide, I’ll show you how to set up payroll in QuickBooks Online and walk you through the step-by-step process on how to do payroll in QuickBooks. Once you have everything in place, doing payroll in QuickBooks will become a straightforward routine, and you can even complete pay runs as often as you need at no extra charge.
Visit QuickBooks Online
Before you begin, you’ll need both employer and employee information to complete the setup and run payroll. Make sure you have these details ready, as it will save a lot of back-and-forth later.
Most of the top payroll services offer an intuitive interface that makes payroll setup easy. The same goes for QuickBooks. It has an online wizard that guides you through the whole process. To see it in action, including how the system processes payroll, watch this video.
For this guide, I’m assuming you’re a QuickBooks Online user who has already purchased a QuickBooks Payroll plan but needs help setting it up. If you’ve yet to get the payroll module, note that the first step in the process will be slightly different, and I’ll explain this below.
Step 1: Navigate to the Payroll tab
Once you’re logged in to QuickBooks Online, look for “Payroll” in the left-hand menu. Click on it to go to the payroll dashboard, where you’ll see a “Get started” button. Clicking that button will jump-start the online wizard that will guide you through all the setup steps.
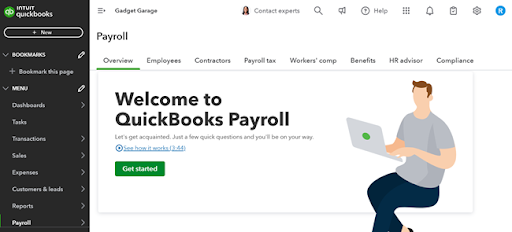
QuickBooks Payroll’s in-app welcome message for first-time users.
If you haven’t signed up for a payroll plan, the dashboard will show a similar page, but if you click the “Get started” button, it will ask you to select the key features you need. However, some tools and services are only available in higher tiers.
There are eight choices:
- Pay workers and file payroll taxes: You should always select this option, as it includes QuickBooks’ full-service payroll with next-day direct deposits and tax filing services.
- Tax penalty protection: If you receive an IRS penalty, QuickBooks will pay all fees and interest up to $25,000 per year. Its tax resolution team will also represent you and help resolve tax filing issues.
- Automatically run payroll: QuickBooks will automatically process payroll, provided your first pay run was successful, you pay via direct deposit, and your team is all salaried employees or hourly workers with default hours.
- Track time: This grants you access to QuickBooks Time, a tool that lets you capture and review employee clock-ins/outs.
- HR support: This includes access to HR forms, compliance tools, and HR advisory services.
- Same-day direct deposit: This lets you pay employees the same business day, provided payroll is processed before 7:00 a.m. Pacific Time (PT).
- Expert payroll setup: With this service, you get a QuickBooks Payroll expert who can complete and review your system setup to make sure everything is correct.
- 24/7 expert product support: This includes 24/7 priority support, step-by-step help, and troubleshooting assistance via phone or chat.
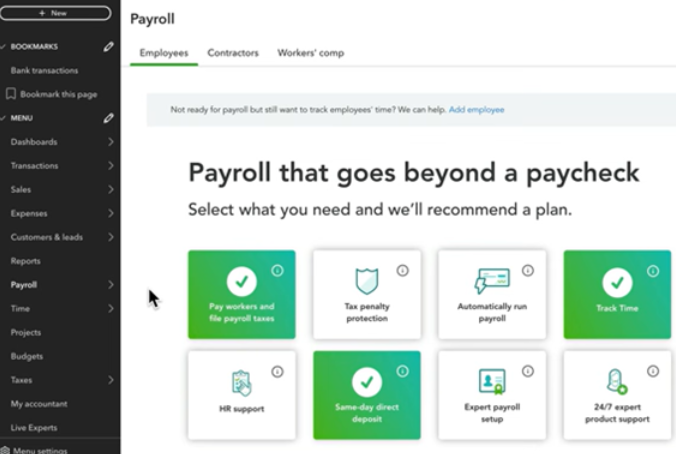
To select a feature, click the applicable box, and QuickBooks Payroll will highlight it in green.
QuickBooks will recommend the best payroll plan for you based on what you’ve selected, but you also have the option to choose one manually. Simply scroll down the page, as it lists the plans with features, including sign-up buttons for each tier.
Step 2: Enter general information about paying employees
In the next step, the system will ask whether or not you have already paid employees in the current calendar year. Select “No” if it applies to you. If you’re switching to QuickBooks Payroll from either a manual system or another payroll software, then you need to click “Yes.”
Note that the system will require you to input YTD payroll details and tax payments made for each employee later in the setup. You can get this information from the last payroll you processed, or you can request detailed pay reports from your previous payroll provider.
Providing information about prior paychecks issued to employees before the beginning of your QuickBooks Payroll subscription is an essential step. This will help ensure that your W-2 forms are accurate come year-end.
Aside from payments to employees in the current calendar year, the system will ask you to indicate the date that you plan to run your first payroll in QuickBooks. It will also require you to enter the physical address where the majority of your employees work, including the details of your company’s payroll contact or representative.
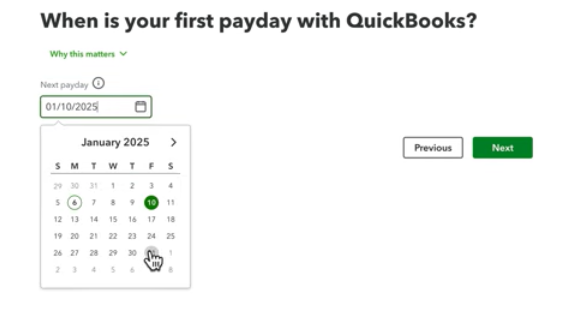
Choosing your first payday on this screen will help set up QuickBooks Payroll’s pay schedule.
Step 3: Add employees
After you have entered your work location, a new window will appear that lets you add your employees’ basic information and payroll details into the system. Click the “Add an employee” button and start inputting the required data of each staff member on your payroll.
Reminder: Ensure that you include all employees who were paid in the current calendar year, even those who have already left the company. Their information still matters for tax reporting and keeps your tax records complete.
Step 3.1: Input personal information
To correctly set up payroll in QuickBooks, you need to enter each employee’s personal information, such as full name, hire date, and email address. With the email addresses in the system, QuickBooks will send employees a link to view their pay stubs and W-2s via its self-service portal, QuickBooks Workforce.
If you’re adding a new hire to the system, this is where you can choose between letting the employee do self-onboarding or entering all the information yourself. There’s even an option for the system to invite employees to track and record their work hours via QuickBooks Time.
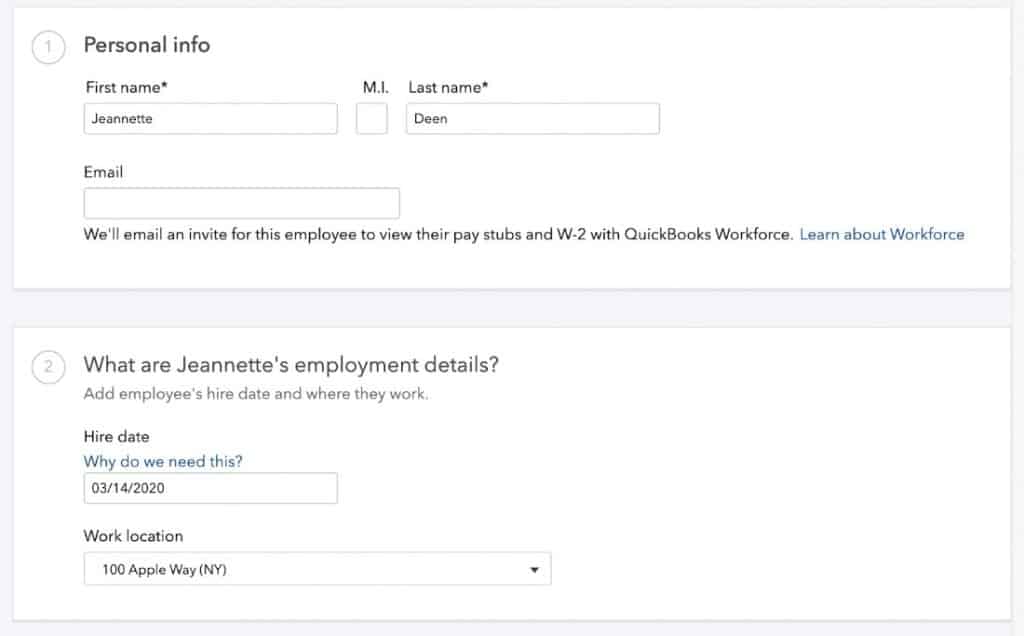
You also follow the same steps for adding new hires, and QuickBooks will let you select the onboarding method.
Important note: You need a subscription to at least the QuickBooks Payroll Premium plan to access the time tracking tool, QuickBooks Time. To learn more about its features, read our QuickBooks Time review.
Step 3.2: Enter wage and payment details
You also have to add the employee’s wage and payment information, such as:
- Pay schedule: Specify a pay schedule for your employees by clicking the “create pay schedule button” in the “How often do you pay (employee)” section. In the dropdown, select the applicable schedule, such as weekly, twice a month, and monthly, among others. You will also be provided the option to use the schedule you just created as the default schedule for succeeding employees who will be added to the system.
- Employee pay: Enter the employee’s pay type (e.g., hourly or salaried) and wage in the “How much do you pay (employee)” section. Then, input the staff’s default number of work hours in a day and workdays in a week. There’s also an option to add other pay types, such as overtime or bonuses, as well as PTO policies for tracking unpaid time off and leave credits.
- Employee deductions/contributions: In the “Does (employee) have any deductions” section, select the applicable contribution and deduction items.
- Employee withholding information: The “What are (employee’s) withholdings” section is where you will use the information from Form W-4s. When you click “Enter W-4 form,” select whether you need the current year’s tax form or an earlier version. QuickBooks stores both new and old versions. This enables you to print one directly from the system to give to employees and capture the correct information.
- YTD payroll information: If you paid the employee this year, use the information from the last payroll check issued and input the YTD payroll details into the system. Note that QuickBooks will ask for totals paid in prior quarters of the current year and any amounts paid within the current quarter, but before you began using QuickBooks Payroll.
- Payment method: The “How do you want to pay (employee)” section contains a dropdown where you can choose either direct deposit or (manual) paper check to pay the employee. If you select direct deposit, use the information from the direct deposit authorization form and the voided check that you requested from the employee.
Related: How to set up QuickBooks Payroll direct deposit
Important note: Please ensure that the YTD totals are accurate. This information will affect your payroll reports, such as the payroll register. It will also impact federal and state taxes that have an annual maximum, including limits on contributions to 401(k) and retirement accounts. To learn more about deduction and contribution limits, check our guide on how to do payroll.
Note that after you’ve completed the payroll profile of one employee, a new window will pop up with “Add Employee” and “Done” buttons. If you only have one employee or want to proceed with the setup, click “Done.” If you want to continue inputting the information of all workers into QuickBooks Payroll, choose “Add Employee” to do this one by one.
You can go back to creating the workers’ profiles by navigating to the Payroll dashboard. Simply select “Payroll” in the left-hand menu. Choose the “Employee” tab from the top menu and then click the “Add an employee” button on the right side of the screen to start the process.
Step 3.3: Review employee list
Once you have completed all of the necessary information for each team member, you will see a list of employees on your payroll for the year. Review it carefully and make sure all of the pay details are correct. If you have new hires or accidentally left someone out, click the “add an employee” button.
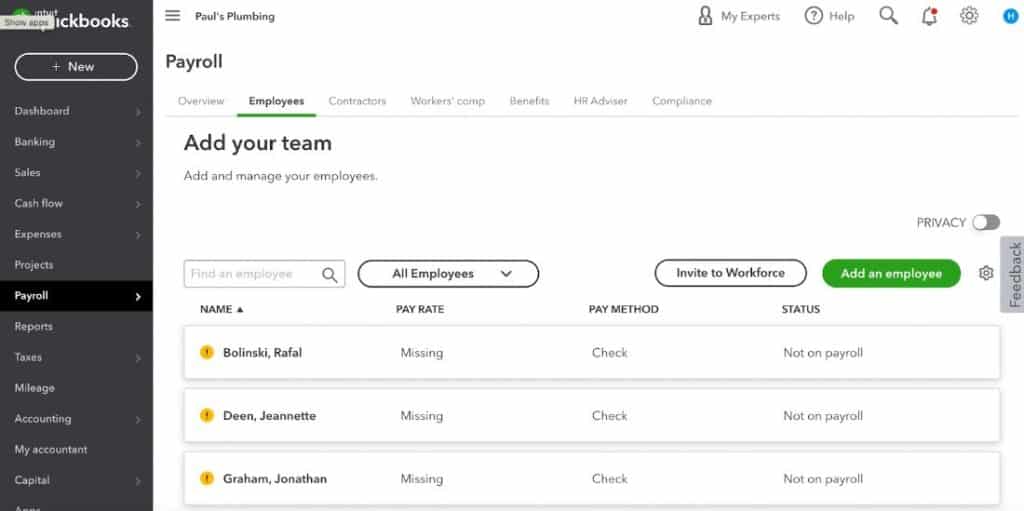
If you spot something on the list that needs to be corrected, click the employee’s name to edit.
Step 4: Set up payroll taxes and bank details
Before processing payroll in QuickBooks, you need to add your company’s payroll tax information, such as state and federal tax numbers. You also have to provide details of the bank account you’ll use to fund payroll.
If you followed the setup wizard, the system will automatically guide you through these steps. However, if you have just completed Step 3.3 of this guide, you must navigate back to the Payroll dashboard to access the list of pending setup tasks and manually go through these processes.
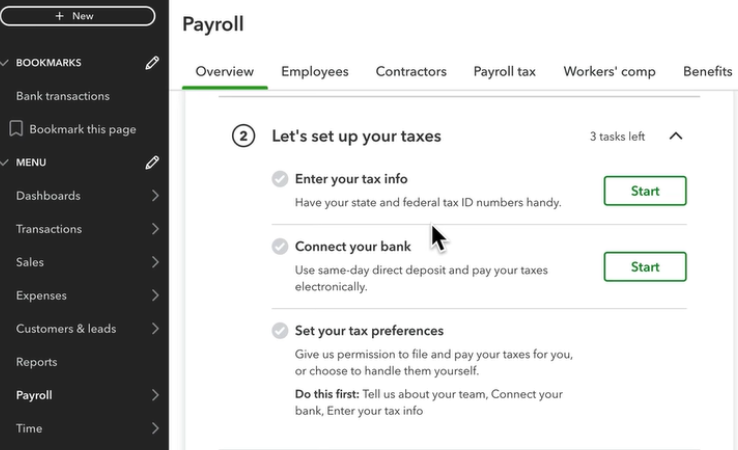
QuickBooks Payroll’s setup wizard has several task categories, each with specific action items and “Start” buttons if you prefer to manually complete the payroll setup.
Related: How to set up & pay payroll tax payments in QuickBooks
Step 5: Click “Run payroll”
After you have completed setting up payroll in QuickBooks, you can now process your first pay run. And if you’re wondering how hard it is to do payroll in QuickBooks, the answer is: not very. Simply go to the Payroll dashboard and click the “Run payroll” button located in the right-hand corner of the screen.
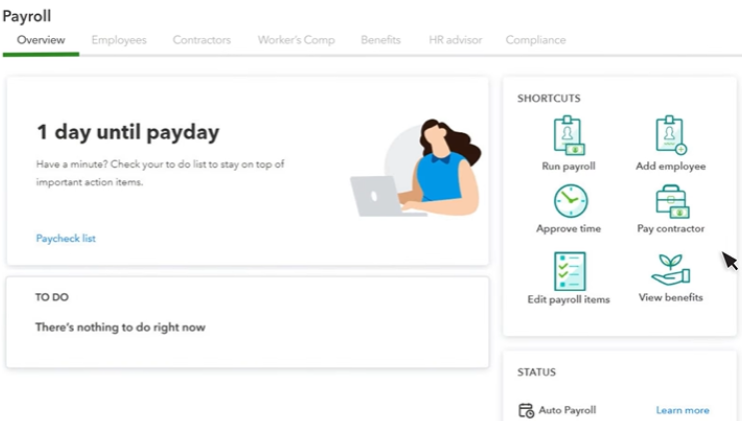
You can use QuickBooks Payroll’s dashboard to track upcoming paydays, check your to-do list, and quickly access key system commands.
The system will direct you to the Run Payroll page, which contains a spreadsheet listing the employees who should be paid for that pay run. In addition to reviewing the employee list, check if the dates that appear in the pay period and pay date fields at the upper left-hand of the screen are correct.
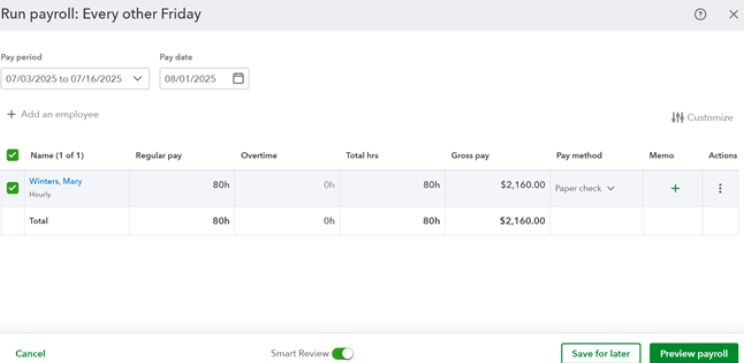
QuickBooks Payroll allows you to hide some of the columns and even change the pay method from paper check to direct deposit.
Step 6: Enter work hours
Note that for salaried employees, the system will automatically populate the total hours based on the default number of work hours you entered for an employee during the initial setup. For hourly employees, you have to manually input the actual work hours in the “Regular pay” text box or upload the time data from your time tracking solution into the system.
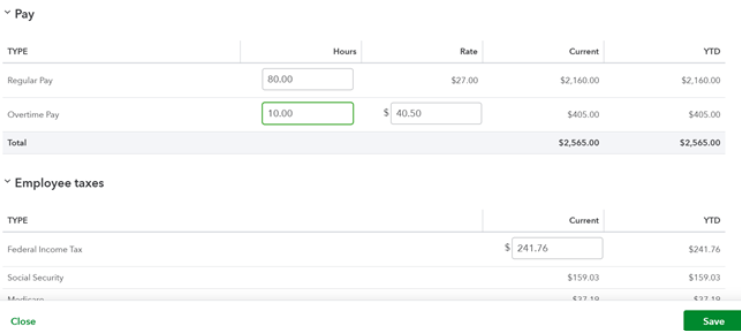
QuickBooks Payroll will automatically calculate the regular and overtime pay based on edits to these two data fields.
If you subscribe to the Premium or Elite plan, which allows you to use QuickBooks Time to capture and track employee attendance, your staff’s work hours will automatically appear in QuickBooks Payroll — ready for you to review and approve. If there are changes to the staff’s working hours, feel free to update them in the system.
Step 7: Review and submit payroll
This step is your last chance to review and edit the payroll information before finalizing it. Aside from the total hours worked and other pay details, check the payment method to ensure that employees who should be paid by direct deposit or paychecks show correctly. Also, review both the employer and employee tax amounts.
After you have finished reviewing your employee’s time data and pay information, click the “Preview payroll” button located at the bottom right of the screen. The system will provide you with a summary of your total payroll cost for the pay period, including the list of employees, each with details of the total work hours, gross and net pay amounts, taxes, and deductions.
If you’re satisfied that everything is correct, click the “Submit payroll” button at the bottom right of the screen. You can then print payroll checks in QuickBooks and/or direct deposit remittance advice to distribute to employees.
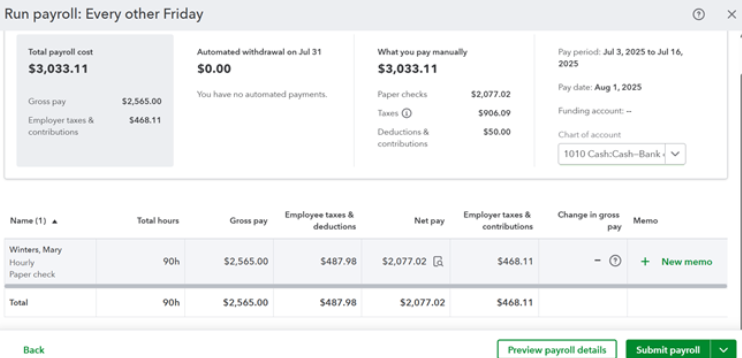
While reviewing your payroll, make sure that you check the net pay and both the employer and employee tax amounts for reasonableness. When everything looks good, click “Submit Payroll” to complete.
If you’re using QuickBooks Online for your accounting software, a bill will automatically be created for each payroll processed, making reconciling your payroll account a breeze. For more information, check out our guide to reconciling payroll liabilities in QuickBooks.
For more general help with processing payroll, check out our payroll training tips.
What happens after you run payroll in QuickBooks
Submitting payroll in the system triggers QuickBooks to handle the behind-the-scenes work. From filing payroll taxes to making key reports available, the software takes over tasks that would otherwise be time-consuming to manage manually. Here are some examples:
- Employee pay stubs delivered via QuickBooks Workforce: If employees are invited to Workforce, they’ll automatically receive digital pay stubs and can view their pay history and tax documents at any time.
- Payroll data is posted to your books: If you use both QuickBooks Online and QuickBooks Payroll, the system automatically records payroll entries into your chart of accounts. This helps ensure that your financial reports stay accurate and up to date.
- Payroll taxes are scheduled and filed: Depending on your plan, QuickBooks calculates, schedules, and pays your federal, state, and local taxes. You’ll also get reminders for quarterly filings like Form 941.
- W-2s and 1099s are prepared at year-end: The system generates these tax forms based on your payroll data, making it easier to file on time and meet IRS deadlines.
- Reports are made available for your review: QuickBooks grants you access to over 20 pay-related reports like the payroll summary, paycheck history, and payroll tax liability reports.
Related: How to run QuickBooks Payroll reports
Frequently asked questions (FAQs)
No, you can purchase QuickBooks Payroll as a standalone pay processing software in case you already have an accounting system. However, if you’re looking for both, QuickBooks offers three plans that bundle payroll and bookkeeping together.
Yes, it can. All QuickBooks Payroll plans calculate and file federal and state payroll taxes for you. However, if you want it to handle local taxes, you have to upgrade to its higher tiers.
It depends on your plan. The Core plan includes next-day direct deposits, while the Premium and Elite tiers come with a same-day option.
Yes, it is. Many small businesses use QuickBooks Payroll because of its fast direct deposits, full-service pay processing with tax filings, and easy integration with QuickBooks Online.
Bottom Line
By following these seven simple steps, you can get your QuickBooks Payroll account set up and your payroll processed in just a few minutes. QuickBooks Online users don’t need to search for another provider to find the right payroll solution for their business.
Whether you’re just getting started or switching from another payroll system, processing payroll with QuickBooks gives you the tools to pay employees on time, file taxes, and stay compliant. Sign up for a plan today!
Visit QuickBooks Payroll